


-
Math-U-See
- Online Instruction with Video Access
- Adapting to the Updated Format in Algebra 1: Principles of Secondary Mathematics
- Why Did Demme Learning Develop Algebra 1: PSM?
- Transferring Digital Licenses
- Strategies for Gamma: Multi-Digit Multiplication with Manipulatives
- Pre-Algebra Lesson 8 Solutions
- Why Upper Level Math Presenters are Off-Screen
- What Are Skip Counting Songs and Where Can I Find Them?
- Is Demme Learning Discontinuing the Math-U-See DVDs?
- Math-U-See PreAlgebra Tips for Success
- Math-U-See Algebra 1: Legacy Tips for Success
- Math-U-See Geometry Tips for Success
- Math-U-See Algebra 2: Legacy Tips for Success
- Why Is Counting an Inefficient Method for Solving Math Facts?
- How Math-U-See Aligns with Texas Math Standards (TEKS)
- How Money Blocks Use Grouping by Five to Teach Money Concepts
- Using Fraction Overlays
- Pacing in Algebra 2: Principles of Secondary Mathematics
- What a Week Looks Like in Algebra 2: Principles of Secondary Mathematics
- How a Lesson Works in Algebra 2: Principles of Secondary Mathematics
- How to Know Algebra 2: PSM is Right for Your Student
- Using the Printed Algebra 1: Principles of Secondary Mathematics Instructor Handbooks
- Show all articles ( 19 ) Collapse Articles
-
- Activity Sheets
- Application and Enrichment Solutions for Older Editions
- Calculator Usage
- Corrections for Comb-Bound Editions
- Course Descriptions
- Engaging Your Math-U-See Student
- Honors Solutions for Older Editions
- How to Use the Digital Toolbox
- Math-U-See Curriculum Cover Images
- Math-U-See Curriculum Student Workbooks
- How to Teach Math-U-See Lessons
- Math-U-See Magnetic Blocks
- Math-U-See Mastery
- Math-U-See Tests
- Math-U-See Videos
- Playing DVDs on Windows 10
- Printable Graph Paper
- Record Keeping, Grading, and Transcripts
- Word Problem Tips
- Tips for New Math-U-See Users
- Tips for the struggling math student
- Using Math-U-See with Color Vision Deficiency
- Version Compatibility
- What do I need to use Math-U-See?
- Math-U-See Curriculum Softcover Instruction Manuals
- When Students Struggle with Fractions
- Manipulative Kit Contents
- Do Demme Learning Products Follow State Standards?
- Math-U-See Video Lengths
- How to Print a Completion Certificate for a Math-U-See Level
- The Value of Math-U-See Student Workbook and Tests
- Why Upper Level Math Presenters are Off-Screen
- Understanding Changes to Demme Learning Bundled Sets
- Are Math-U-See Manipulatives Non-Toxic?
- Watching Math-U-See Videos on a Chromebook?
- Is Demme Learning Discontinuing the Math-U-See DVDs?
- Why Is Counting an Inefficient Method for Solving Math Facts?
- How Math-U-See Aligns with Texas Math Standards (TEKS)
- How Money Blocks Use Grouping by Five to Teach Money Concepts
- Show all articles ( 36 ) Collapse Articles
-
- Strategies for Gamma: Multi-Digit Multiplication with Manipulatives
- Pre-Algebra Lesson 8 Solutions
- Why Upper Level Math Presenters are Off-Screen
-
- Activity Sheets
- Application and Enrichment pages for Primer, Alpha and Beta
- Calculator Usage
- Corrections for Comb-Bound Editions
- Math Fact Sheets
- Math-U-See Curriculum Cover Images
- Math-U-See Curriculum Student Workbooks
- Record Keeping, Grading, and Transcripts
- Version Compatibility
- Math-U-See Video Lengths
- What Are Skip Counting Songs and Where Can I Find Them?
- Show all articles ( 8 ) Collapse Articles
-
- Activity Sheets
- Application and Enrichment pages for Primer, Alpha and Beta
- Calculator Usage
- Corrections for Comb-Bound Editions
- Math Fact Sheets
- Math-U-See Curriculum Cover Images
- Math-U-See Curriculum Student Workbooks
- Record Keeping, Grading, and Transcripts
- Version Compatibility
- Math-U-See Video Lengths
- Show all articles ( 7 ) Collapse Articles
-
- Application and Enrichment Solutions for Older Editions
- Calculator Usage
- Corrections for Comb-Bound Editions
- Math Fact Sheets
- Math-U-See Curriculum Cover Images
- Math-U-See Curriculum Student Workbooks
- Record Keeping, Grading, and Transcripts
- Version Compatibility
- Math-U-See Video Lengths
- Strategies for Gamma: Multi-Digit Multiplication with Manipulatives
- What Are Skip Counting Songs and Where Can I Find Them?
- Show all articles ( 8 ) Collapse Articles
-
- Application and Enrichment Solutions for Older Editions
- Calculator Usage
- Corrections for Comb-Bound Editions
- Math Fact Sheets
- Math-U-See Curriculum Cover Images
- Math-U-See Curriculum Student Workbooks
- Record Keeping, Grading, and Transcripts
- Version Compatibility
- Math-U-See Video Lengths
- Show all articles ( 6 ) Collapse Articles
-
- Application and Enrichment Solutions for Older Editions
- Calculator Usage
- Corrections for Comb-Bound Editions
- Math Fact Sheets
- Math-U-See Curriculum Cover Images
- Math-U-See Curriculum Student Workbooks
- Record Keeping, Grading, and Transcripts
- Version Compatibility
- Math-U-See Video Lengths
- Epsilon Tips and Tricks for Fractions
- Using Fraction Overlays
- Show all articles ( 8 ) Collapse Articles
-
- Application and Enrichment Solutions for Older Editions
- Calculator Usage
- Corrections for Comb-Bound Editions
- Math Fact Sheets
- Math-U-See Curriculum Cover Images
- Math-U-See Curriculum Student Workbooks
- Record Keeping, Grading, and Transcripts
- Version Compatibility
- Math-U-See Video Lengths
- Show all articles ( 6 ) Collapse Articles
-
- Pre-Algebra Lesson 7 Support Video
- Application and Enrichment Solutions for Older Editions
- Calculator Usage
- Corrections for Comb-Bound Editions
- Course Descriptions
- Honors Solutions for Older Editions
- Math-U-See Curriculum Cover Images
- Math-U-See Curriculum Student Workbooks
- Printable Graph Paper
- Record Keeping, Grading, and Transcripts
- Version Compatibility
- Bridge Materials: Pre-Algebra to Algebra 1: Principles of Secondary Mathematics
- Math-U-See Video Lengths
- Order of Operations - PreAlgebra Lesson 14 and Algebra 1: Legacy Edition Lesson 2
- Pre-Algebra Lesson 8 Solutions
- Math-U-See PreAlgebra Tips for Success
- Show all articles ( 13 ) Collapse Articles
-
- How a Lesson Works in Algebra 1: Principles of Secondary Mathematics
- What a Week Looks Like in Algebra 1: Principles of Secondary Mathematics
- Record Keeping, Grading, and Transcripts
- Better Practice versus More Practice in Algebra 1: Principles of Secondary Mathematics
- Pacing in Algebra I: Principles of Secondary Mathematics
- What's the Difference between Algebra 1: Principles of Secondary Mathematics and Algebra 1: Legacy?
- A1: PSM Videos
- Bridge Materials: Pre-Algebra to Algebra 1: Principles of Secondary Mathematics
- Math-U-See Video Lengths
- Adapting to the Updated Format in Algebra 1: Principles of Secondary Mathematics
- Why Did Demme Learning Develop Algebra 1: PSM?
- Readiness and Review Materials: Algebra 1: PSM to Algebra 2: PSM
- If I've Completed Algebra 1: PSM, What Should I Do Next?
- Using the Printed Algebra 1: Principles of Secondary Mathematics Instructor Handbooks
- Show all articles ( 11 ) Collapse Articles
-
- Extra Practice Pages for Algebra 1: Legacy Edition
- Algebra 1: Legacy Edition Lesson 1 Support Video
- Calculator Usage
- Corrections for Comb-Bound Editions
- Course Descriptions
- Honors Solutions for Older Editions
- Math-U-See Curriculum Cover Images
- Math-U-See Curriculum Student Workbooks
- Printable Graph Paper
- Version Compatibility
- Record Keeping, Grading, and Transcripts
- What's the Difference between Algebra 1: Principles of Secondary Mathematics and Algebra 1: Legacy?
- Math-U-See Video Lengths
- Order of Operations - PreAlgebra Lesson 14 and Algebra 1: Legacy Edition Lesson 2
- Why Did Demme Learning Develop Algebra 1: PSM?
- Math-U-See Algebra 1: Legacy Tips for Success
- Show all articles ( 13 ) Collapse Articles
-
- Geometry Lesson 2A Question 16 Support Video
- Geometry Lessons 17 & 19 Support Video – Square Roots
- Calculator Usage
- Corrections for Comb-Bound Editions
- Course Descriptions
- Math-U-See Curriculum Cover Images
- Math-U-See Curriculum Student Workbooks
- Printable Graph Paper
- Version Compatibility
- Record Keeping, Grading, and Transcripts
- Math-U-See Video Lengths
- Math-U-See Geometry Tips for Success
- If I've Completed Algebra 1: PSM, What Should I Do Next?
- Show all articles ( 10 ) Collapse Articles
-
- Algebra 2 Lesson 2 Finding the Least Common Denominator Support Video
- Algebra 2 Lesson 4 Square Roots Support Video
- Algebra 2 Lesson 5B-1 (1,5,10) Support Video
- Algebra 2 Lesson 5B-1 (7,9,11) Support Video
- Algebra 2 Lesson 6 Support Video
- Algebra 2 Lessons 7–8 Imaginary Numbers and Conjugates Support Video
- Algebra 2 Lesson 11 Completing the Square Support Video
- Algebra 2 Lesson 23 and 26 Graphing Ellipses and Hyperbolas Support Video
- Algebra 2 Lesson 27a Support Video
- Calculator Usage
- Corrections for Comb-Bound Editions
- Course Descriptions
- Extra Practice Sheets for Algebra 2
- Honors Solutions for Older Editions
- Math-U-See Curriculum Cover Images
- Math-U-See Curriculum Student Workbooks
- Printable Graph Paper
- Version Compatibility
- Record Keeping, Grading, and Transcripts
- Math-U-See Video Lengths
- Math-U-See Algebra 2: Legacy Tips for Success
- Show all articles ( 18 ) Collapse Articles
-
- PreCalculus Lesson 7 Support Video
- PreCalculus Lesson 9 Proving Identities Support Video
- PreCalculus Test 14 Questions 9 and 10 Support Video
- PreCalculus Lesson 17 - Tips on how to graph Polar Equations
- PreCalculus Lesson 21 & 22 - Helpful Hints
- PreCalculus Lesson 23 Graphing Sine and Cosine Support Video
- PreCalclulus Lesson 24 Support Video: Graphing Secant & Cosecant
- PreCalclulus Lesson 25 Support Video: Graphing Tangent & Cotangent
- PreCalculus Lesson 26 & L27 Support Video: Finding 'n'
- Calculator Usage
- Corrections for Comb-Bound Editions
- Course Descriptions
- Honors Solutions for Older Editions
- Math-U-See Curriculum Cover Images
- Math-U-See Curriculum Student Workbooks
- Printable Graph Paper
- Version Compatibility
- Record Keeping, Grading, and Transcripts
- Math-U-See Video Lengths
- Show all articles ( 16 ) Collapse Articles
-
- Adapting to the Updated Format in Algebra 2: Principles of Secondary Mathematics
- Readiness and Review Materials: Algebra 1: PSM to Algebra 2: PSM
- Pacing in Algebra 2: Principles of Secondary Mathematics
- What a Week Looks Like in Algebra 2: Principles of Secondary Mathematics
- How a Lesson Works in Algebra 2: Principles of Secondary Mathematics
- How to Know Algebra 2: PSM is Right for Your Student
- If I've Completed Algebra 1: PSM, What Should I Do Next?
- Show all articles ( 4 ) Collapse Articles
-
- Addressing Hesitations About Manipulatives
- Digital Manipulative App FAQs
- Virtual Manipulatives
- Math-U-See Magnetic Blocks
- Why and when to use Math-U-See manipulatives
- Can I order replacement pieces of Math-U-See manipulatives?
- Manipulative Kit Contents
- Strategies for Gamma: Multi-Digit Multiplication with Manipulatives
- Are Math-U-See Manipulatives Non-Toxic?
- How Money Blocks Use Grouping by Five to Teach Money Concepts
- Using Fraction Overlays
- Show all articles ( 8 ) Collapse Articles
-
- Online Instruction with Video Access
- Troubleshooting the Online Instruction with Video(s) and the Digital Toolbox
- How to Use the Digital Toolbox
- Math-U-See Videos
- Online Drill Tool
- Using the Worksheet Generator
- Application and Enrichment Solutions for Older Editions
- Digital Manipulative App FAQs
- Virtual Manipulatives
- Math Fact Sheets
- Record Keeping, Grading, and Transcripts
- Extra Practice Pages for Algebra 1: Legacy Edition
- Where can I find the solutions for problems in the Student Workbooks and Test Books in the Digital Toolbox?
- How do I create a student account?
- How to Modify Your Student’s Account
- What If I Find an Error?
- How to Monitor Your Student’s Progress in the Digital Toolbox
- How to Use the Digital Toolbox on a Mobile Device
- Can I Watch the Digital Toolbox Videos on My Smart TV?
- Watching Math-U-See Videos on a Chromebook?
- Transferring Digital Licenses
- Data Privacy and Login Access Across Demme Learning Platforms
- Using Fraction Overlays
- Show all articles ( 20 ) Collapse Articles
-
Spelling You See
-
- Addressing Errors In Spelling You See
- Handwriting in Spelling You See
- Mastery in Spelling You See
- Overlapping Chunks
- We didn't have time to do spelling every day this week. Is it important to finish every worksheet?
- Do Demme Learning Products Follow State Standards?
- Timed Segments in Spelling You See
- Understanding Changes to Demme Learning Bundled Sets
- How Do I Access Spelling You See Online Resources?
- Why Don't Spelling You See Sets Include Erasable Colored Pencils?
- Identifying Challenging Words in Spelling You See
- Show all articles ( 8 ) Collapse Articles
-
-
- Addressing Errors In Spelling You See
- Base words vs root words
- What comes after Modern Milestones?
- Timed Segments in Spelling You See
- How Do I Access Spelling You See Online Resources?
- Why Don't Spelling You See Sets Include Erasable Colored Pencils?
- Identifying Challenging Words in Spelling You See
- Show all articles ( 4 ) Collapse Articles
-
-
Analytical Grammar
- Analytical Grammar Level Breakdowns
- Analytical Grammar Process Chart
- Analytical Grammar Group Learning Sample Syllabus
-
- Playing your Analytical Grammar DVDs
- How can I use Analytical Grammar in a classroom or group setting?
- Do Demme Learning Products Follow State Standards?
- What's Changed with Analytical Grammar?
- Analytical Grammar Level Breakdowns
- Analytical Grammar Process Chart
- Understanding Changes to Demme Learning Bundled Sets
- Show all articles ( 4 ) Collapse Articles
-
-
- Articles coming soon
-
Accelerated Individualized Mastery
- How to Use AIM: Multiplication
- Getting Started with AIM: Multiplication
- How to Use AIM: Addition and Subtraction
- Getting Started with AIM: Addition and Subtraction
- How Long Does It Take to Complete the AIM Program? Is There a Pacing Guide?
- Why Is Counting an Inefficient Method for Solving Math Facts?
- Show all articles ( 3 ) Collapse Articles
-
-
- Accelerated Individualized Mastery for Addition and Subtraction 2021 Updates
- Tips and Next Steps for Accelerated Individualized Mastery (AIM) for Addition and Subtraction
- How to Use AIM: Addition and Subtraction
- Getting Started with AIM: Addition and Subtraction
- How Long Does It Take to Complete the AIM Program? Is There a Pacing Guide?
- Show all articles ( 2 ) Collapse Articles
-
-
WriteShop
-
Customer Service
- Reset your password
- Do you have an affiliate program?
- Returns & Exchanges
- Shipping Options
- Previous Orders
- I’ve purchased a set, but when I look at my order in my account dashboard it lists several different products.
- Defective Items
- Photocopies & Copyright
- Does Demme Learning Work With My State's Educational Assistance Program?
- Shipping & Delivery Times for School and Classroom Orders
- How Can I Use Shop Pay for My Demme Learning Purchases?
- Show all articles ( 8 ) Collapse Articles
-
Schools
- Does Demme Learning Work With My State's Educational Assistance Program?
- Bulk Uploading Student Accounts via CSV in the Digital Toolbox (For Schools Only)
- How to Administer the School Placement Test
- Shipping & Delivery Times for School and Classroom Orders
- Show all articles ( 1 ) Collapse Articles
-
-
- School Administrator Account User Guide
- Creating School Teacher Account
- School Student Accounts
- Professional Access
- Show all articles ( 1 ) Collapse Articles
-
Digital Tools
- Watching Math-U-See Videos on a Chromebook?
- How to Whitelist the Demme Learning Digital Toolbox URL When Using AVG Anti-virus
- Whitelisting Domains for Demme Learning Digital Toolbox
- Bulk Uploading Student Accounts via CSV in the Digital Toolbox (For Schools Only)
- Using Region Preferences in the Digital Toolbox (Homeschool Parent / Instructor Accounts Only)
- How do I Assign a Course to my Student in Early Access?
- How to Use Early Access on a Mobile Device
- How to Use Early Access
- How to Submit Feedback in Early Access
- Trouble Opening Demme Learning Pages in Safari on iPhone or iPad?
- Show all articles ( 7 ) Collapse Articles
-
- Online Drill Tool
- Using the Worksheet Generator
- How do I create a student account?
- Online Instruction with Video Access
- Printable Graph Paper
- Troubleshooting the Online Instruction with Video(s) and the Digital Toolbox
- How to Modify Your Student’s Account
- Reset your password
- What If I Find an Error?
- How to Monitor Your Student’s Progress in the Digital Toolbox
- How to Use the Digital Toolbox on a Mobile Device
- Can I Watch the Digital Toolbox Videos on My Smart TV?
- How to Use the Digital Toolbox
- How to Whitelist the Demme Learning Digital Toolbox URL When Using AVG Anti-virus
- Whitelisting Domains for Demme Learning Digital Toolbox
- Bulk Uploading Student Accounts via CSV in the Digital Toolbox (For Schools Only)
- Using Region Preferences in the Digital Toolbox (Homeschool Parent / Instructor Accounts Only)
- Show all articles ( 14 ) Collapse Articles
-
Building Faith and Family
-
- Course Descriptions
- Stewardship 1st and 2nd edition compatibility
- Stewardship Prerequisites
- Stewardship Resources
- Stewardship Samples
- What do I need for Stewardship Math?
- How to redeem your access code and access the Stewardship Online Instruction with Video.
- Show all articles ( 4 ) Collapse Articles
-
-
Group Learning
-
Subscriptions
- What Is an Individual Subscription?
- How do Billing Cycles and Renewals Work?
- Getting Started With Your Individual Subscription
- What is a Group Subscription and How Does it Work?
- How Do I Create a Group?
- Adding and Managing Students in a Group
- How Do I Add Additional Instructors to a Group?
- How Do I Move or Change a Student's Level?
- How Do I Add Courses to a Group?
- Why Can’t I See My Course Online?
- How Do I Redeem Unused Credits?
- What Happens When a Subscription Expires?
- Managing Your Subscription: Upgrades, Downgrades, and Cancellations
- How to Redeem a Demme Learning Subscription or an Online Instruction With Video Redemption Code
- Show all articles ( 11 ) Collapse Articles
-
- What is a Group Subscription and How Does it Work?
- How Do I Create a Group?
- Adding and Managing Students in a Group
- How Do I Add Additional Instructors to a Group?
- How Do I Move or Change a Student's Level?
- How Do I Add Courses to a Group?
- Why Can’t I See My Course Online?
- How Do I Redeem Unused Credits?
- What Happens When a Subscription Expires?
- Managing Your Subscription: Upgrades, Downgrades, and Cancellations
- Show all articles ( 7 ) Collapse Articles
- Support Center
- Subscriptions
- Individual Subscriptions
- Getting Started With Your Individual Subscription
Getting Started With Your Individual Subscription
Congratulations on starting your journey with Demme Learning! Once you have purchased a subscription, follow these steps to set up your account, add your courses, and get your students started.
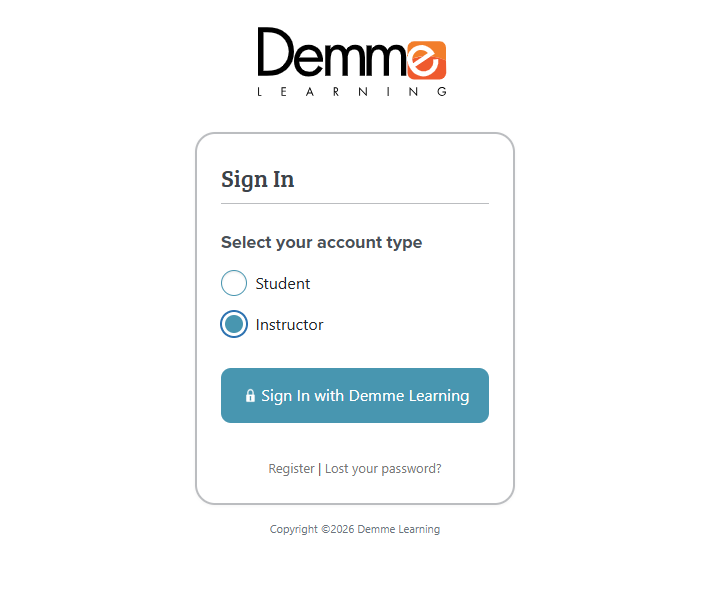
1. Sign In to Your Account
To begin, visit new.demmelearning.com.
- Select Instructor as your account type.
- Click Sign In with Demme Learning and enter your credentials.
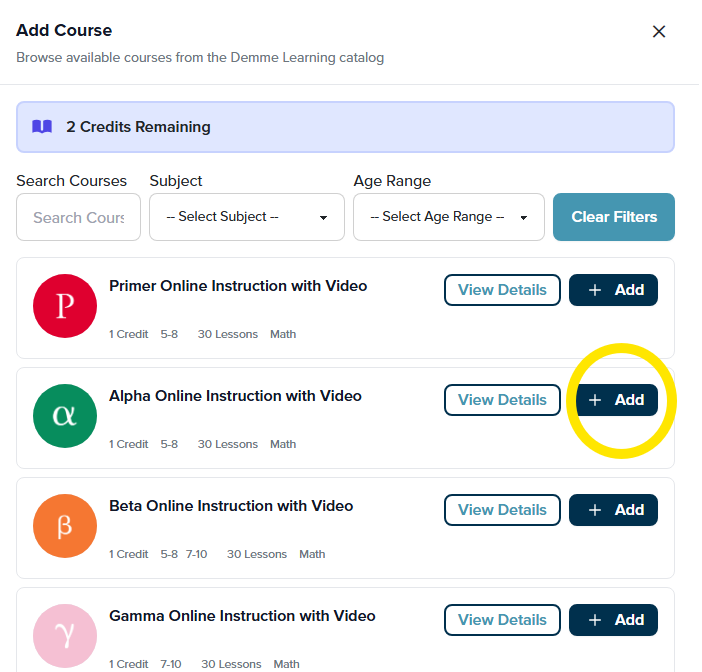
2. Add Courses and Freemium Content to Your Library
Before you can assign courses to a student, you must add the desired levels to your personal digital library. This process uses your subscription’s Course Credits.
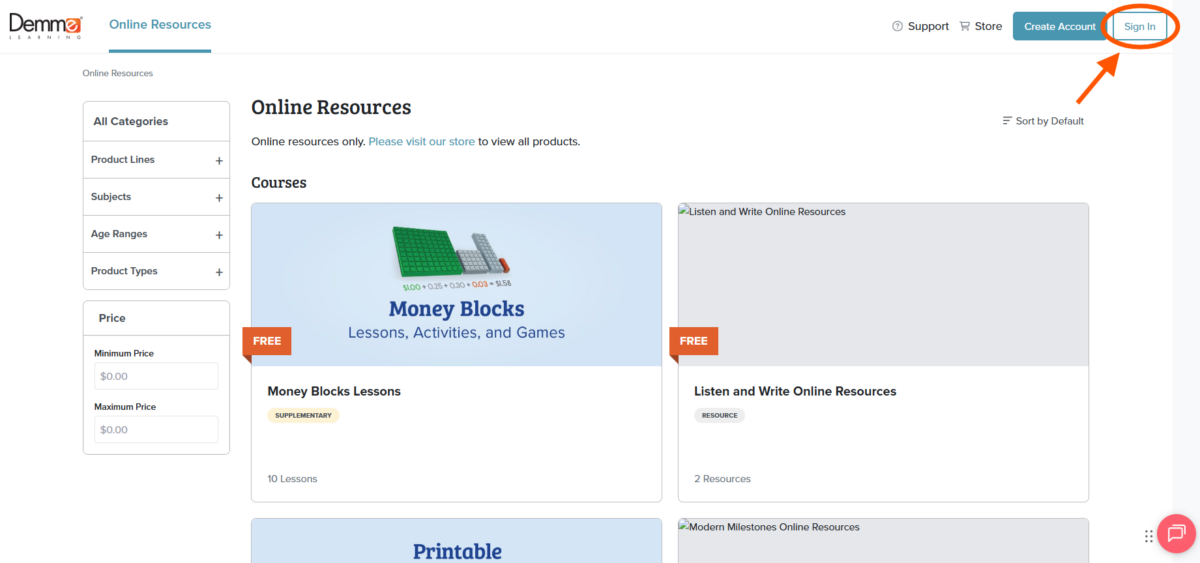
- From your dashboard, select the Online Resources tab at the top of the page.
- Browse the catalog and choose the level or course you wish to add (e.g., Beta Online Instruction with Video).

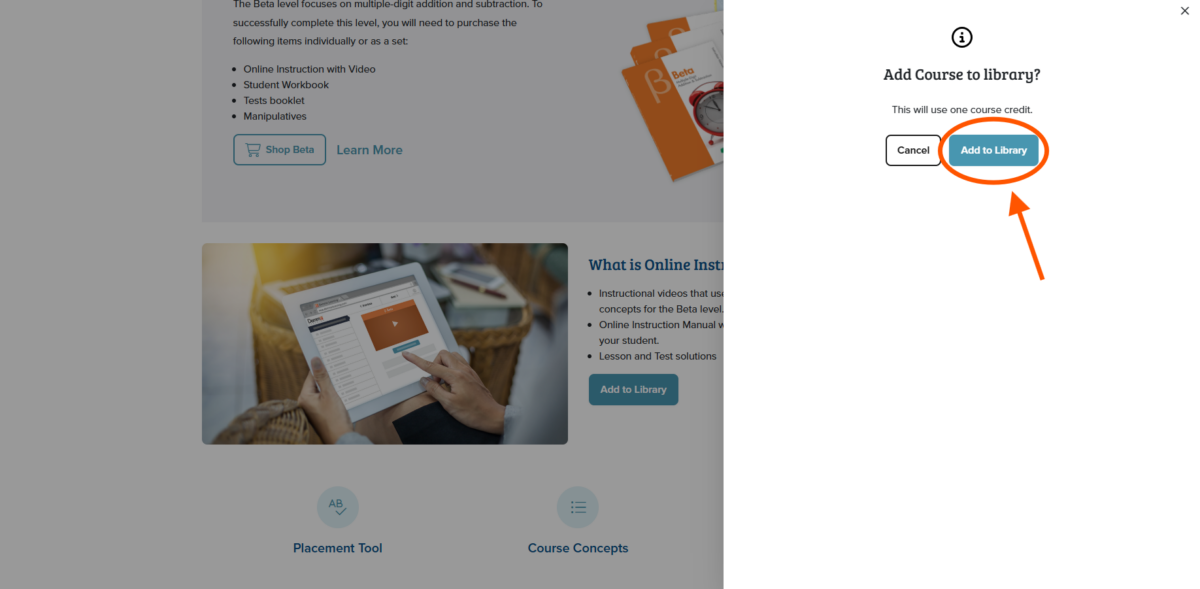
- Click the Add to Library button.

- A confirmation prompt will appear stating this will use one course credit; click Add to Library again to confirm.

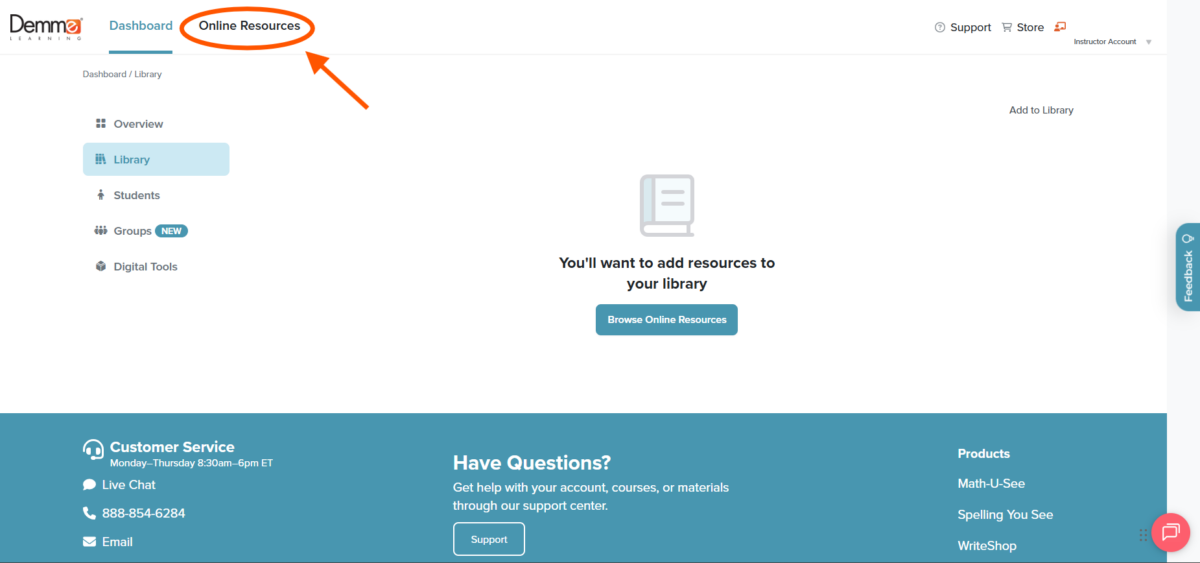
- You can now view and access these levels at any time by clicking Library in the left-hand sidebar in your dashboard.
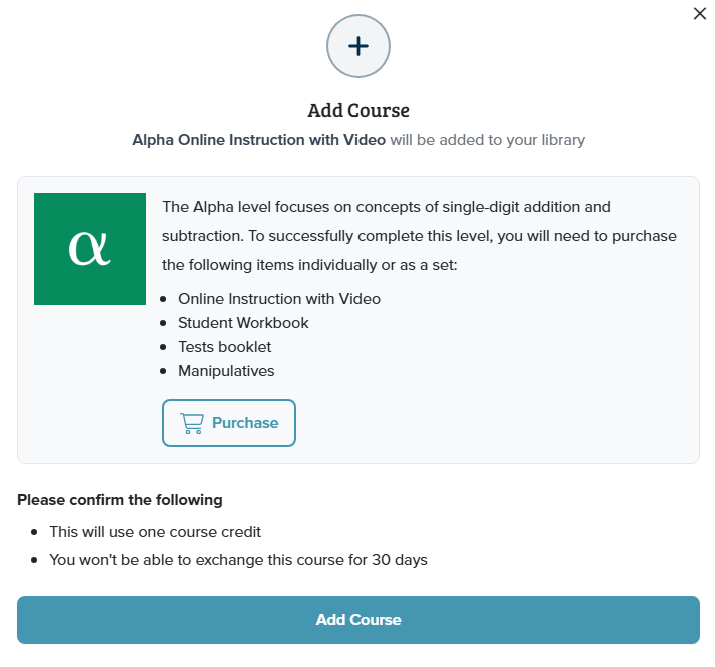
Alternate way to add a Course to Your Library
- From your Dashboard, select Library, select Add to Library.

- Select the course you want to add, click +Add, and Add Course.
3. Create Student Accounts
Each student needs their own profile to track progress and access assigned materials.
- In your Dashboard, click Students in the left-hand sidebar.
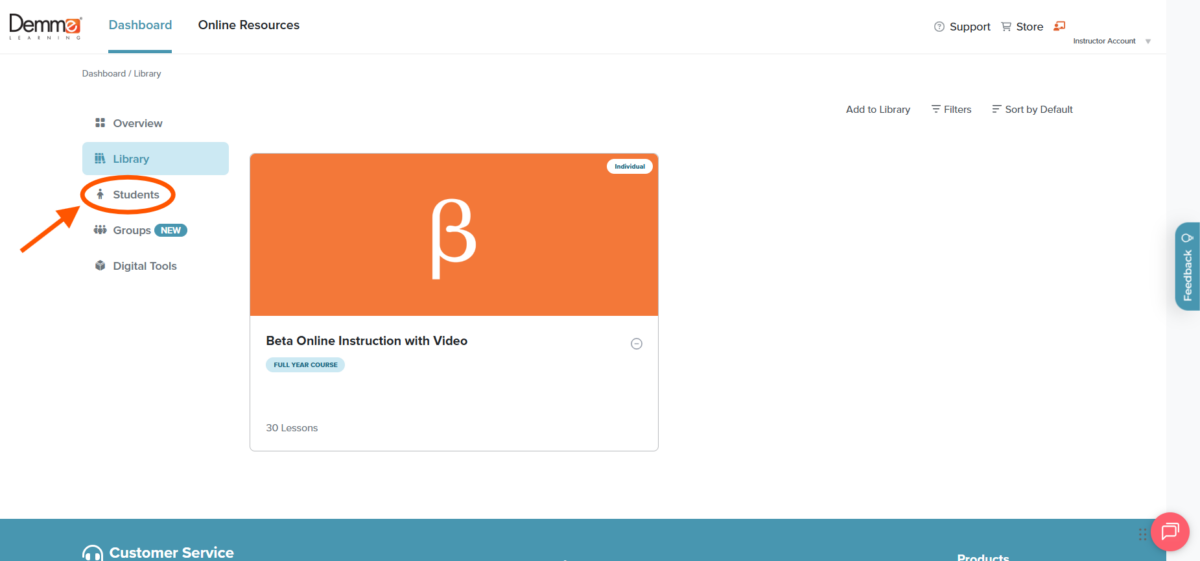
- Select the Add Student button.

- Enter the student’s first and last name and create a unique Username and Password for them.
- Note: Usernames cannot be changed once created and should not be email addresses.
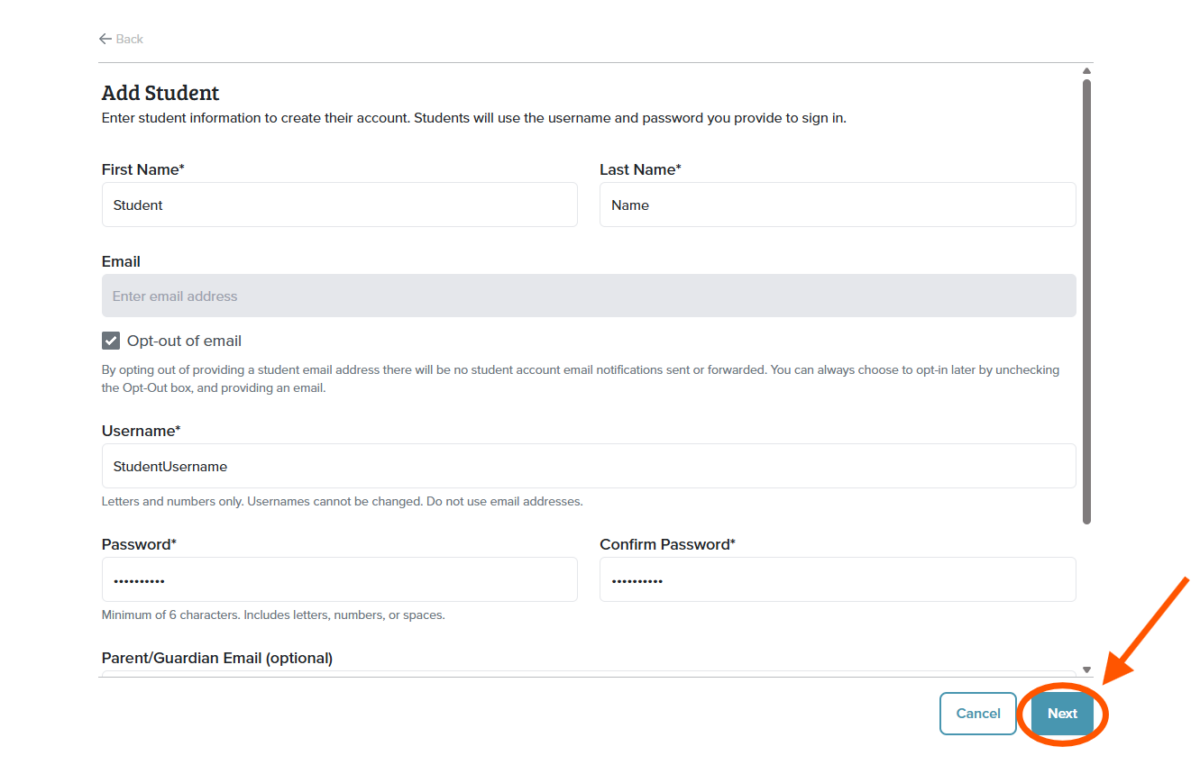
- Click Next.
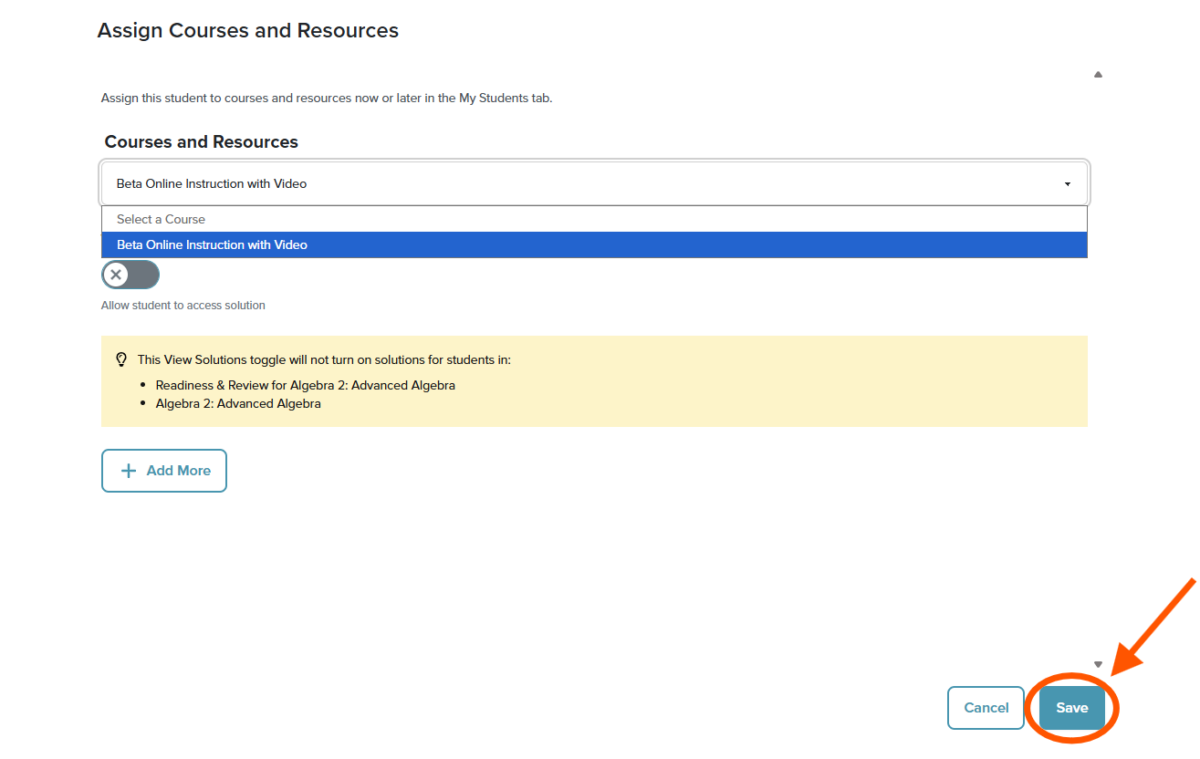
Assigning a Course to Your New Student
- On the Assign Course and Resources Page, select the drop-down menu and select the course you want to assign to your student. Save your selections.

- Review the Solutions Visibility Option. (Solutions are defaulted to off unless enabled).

- +Add More (You can assign other courses or freemium content from your library to your student
- Select, Save. You’ll receive a notification that your student was successfully created.

4. Unassigning and Assigning Courses to an Existing Student
Unassign a Course From an Existing Student
- Navigate to Dashboard.
- Select Student, and select the Student’s Name.
- Select their current course
- Select Unassign Course
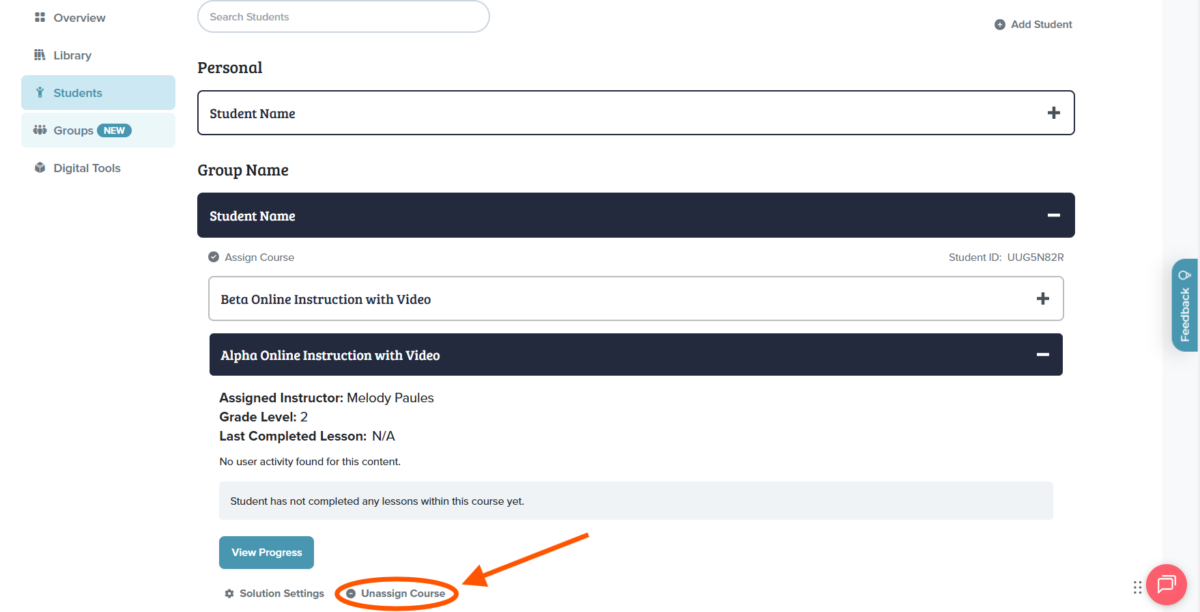
- Confirm you want to unassign the course, select unassign

Assigning a Course to an Existing Student
- Select Students, Select Student’s Name, Select Assign Course

- In the Assign Courses and Resources screen, use the dropdown menu to select a course from your library.
- View Solutions Toggle: You can choose to allow or restrict the student’s access to lesson solutions using the toggle switch.
- Click Save to finalize the new assignment.
If you have multiple available student seats, you can add your next student by returning to Students and selecting Add Student.
5. Removing a Student from an Account
- Navigate to your Dashboard
- Select Students, then select the student’s name you wish to remove.

- Select Remove Student
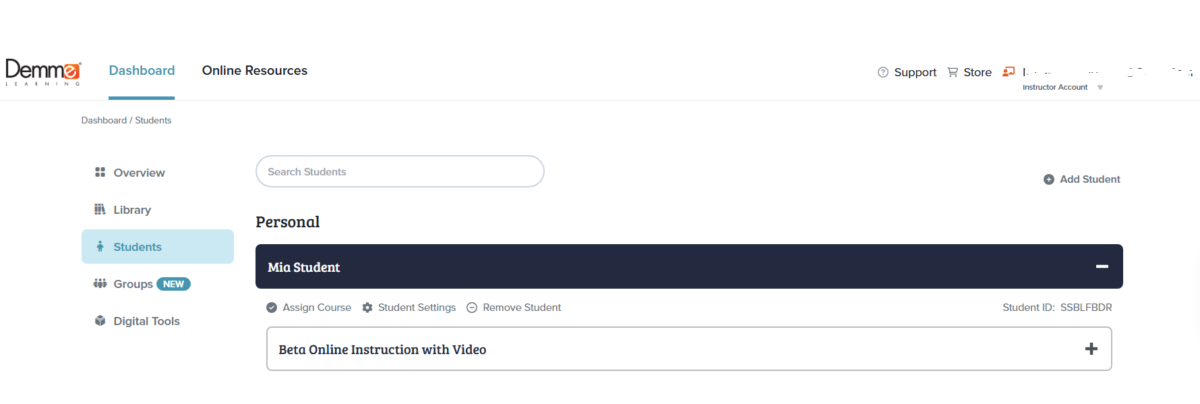
- Review Remove Student, confirm by selecting Remove Student.

- Danger Zone Warning
- Note: As the owner of this student account, they will no longer be able to access your group or any of the other groups they may belong to.

- Select Delete Student to complete.
Was this article helpful?
0 out Of 5 Stars
| 5 Stars | 0% | |
| 4 Stars | 0% | |
| 3 Stars | 0% | |
| 2 Stars | 0% | |
| 1 Stars | 0% |
5
Tags:
In this Article: